Sunday 3 August 2014

Print your document

Print your document

Tutorial

Use File > Print Preview to see how your document will look when it's printed.
You can use the toolbar buttons to see one page, or several pages at once.
Press Esc to get back to the ordinary view of your document.
When you've finished creating your document, you are ready to print.
Choose File > Print, then click OK.

Reference

To print out your document, choose File > Print.

Curiosity Shop: More about printing

When you choose File > Print, you see the Print dialog. There you'll see a "Print What" box. Of course most of the time you want to print your document. But it's often useful to get a printout of the styles you've used in the document. To do that, in the Print What box, choose Styles.


ARTICLE TAKEN FROM
http://shaunakelly.com/word/concepts/print.html

Use page numbering and let the text flow from page to page

Use page numbering and let the text flow from page to page

Tutorial

Flowing text from page to page

Word will flow text from page to page. It works out when text will no longer fit on a page, and puts the text on the next page. Word isn't a typewriter, so you don't need to tell it where the end of each page is to occur. Word works out where a page break will occur based on the way you set up and format your document.
In general, let Word flow the text from page to page. Word controls the text flow using the following information.

What printer do you have?

Word knows how your printer works. For example, it knows how close to the edge of the paper your printer can print.To change the printer that Word is working with, choose File > Print and choose a printer in the Name box.

What size paper are you using?

Choose File > Page Setup and click the Paper tab. Choose your Paper Size. In the Paper Size box, Word will list the paper sizes that your printer can deal with.

What margins have you set up?

Choose File > Page Setup and choose the Margins tab. Set your page margins here, and Word will place yourtext within the margins.

How are your styles formatted?

The formatting of your styles affects how the text flows from page to page.
When you modify a paragraph style, you can modify the settings on theLine and Page Breaks tab. To reach the Line and Page Breaks tab:
  • in Word 2002: Format > Styles and Formatting. Right-click on the name of your style and choose Modify. Click Format, thenParagraph
  • in earlier versions of Word: Format > Styles > Modify > Format > Paragraph.
On the Line and Page Breaks tab, you'll find four important settings. From those with the biggest to the smallest effect, these are:
Tip for tables
"Keep with next" works on paragraphs in tables. If a table is not breaking across a page whereyou think it should, make sure that all the paragraphs aren't set to "Keep with Next".
Page Break Before
Tells Word to put a page break before paragraphs in this style. That is, paragraphs in this style will always appear at the top of a page. Useful for heading styles. Avoid using Insert > Break > Page Break.
Keep with next
Tells Word to keep paragraphs in this style on the same page as the next paragraph.That is, there will never be a page break immediately after paragraphs in this style. Useful for headings, but also useful for making captions stick together with the pictures they're captioning, and for rows in a table.
Widow/Orphan Control
Prevents Word from having the first line of a paragraph alone at the bottom of a page, or the last line of a paragraph stranded at the top of a page. Useful for just about all kinds of text.
Keep lines together
Tells Word to keep all the lines of paragraphs in this style together on one page. That is, there will never be a page break within this paragraph. Useful for text that consists of manyshort paragraphs, although it results in an uneven bottom edge to the pages.
Keep lines together doesn't work on paragraphs in tables. To my mind, that's a bug.

How is each individual paragraph formatted?

You can apply direct formatting to a paragraph, over the top of the formatting of its style.Put the cursor in a paragraph and choose Format > Paragraph and click the Line and Page Breaks tab. You'll find the same controls listed above for use with styles. When these controls are used to define a style, they control all paragraphs formatted in that style. When these controls are used to format an individual paragraph, they affect only that individual paragraph.
Controls you can use for individual paragraphs using Format > Paragraph and choosing the Line and Page Breaks tab:
  • Page Break Before. Avoid using Insert > Break > Page Break.
  • Keep with next
  • Keep lines together
  • Widow/Orphan Control

Page numbering

If you want to insert page numbers in your document, you might reasonably assume that Insert > Page Numbers would be the way to go. That will work, but it doesn't give you much flexibility or control. Newbies use Insert > Page Numbers. It's not for grown ups.
To insert a page number on the bottom of every page, do this:
  • View > Header and Footer.
  • On the Header and Footer toolbar, click the Switch Between Header and Footer button.
  • If you want the page number in the centre of the page, press Tabonce. If you want the page number on the right-hand side of the page, press Tab twice.
  • On the Header and Footer toolbar, click the Insert Page Numberbutton (it's the button with one #).
  • If you don't want the page number on the first page of your document, continue with these steps:
    • On the Header and Footer toolbar, click the Page Setup button (the button that looks like a book).
    • You'll be taken to the Page Setup dialog, on the Layout tab. Click Different First Page, then OK.
  • Click Close.

Reference

Flowing text from page to page, and forcing page breaks

  • Word will work out when your text will no longer fit in the page. It will then flow the text to the top of thenext page.
  • To control how the text flows from page to page, use the following:
    • File > Page Setup to set printer, paper size and margins
    • modify a paragraph style to set Page Break Before, Keep Lines Together, Keep With Next andWidow/Orphan control
    • apply direct formatting to individual paragraphs to set Page Break Before, Keep Lines Together, Keep With Next andWidow/Orphan control

Page numbering

To insert a page number on the bottom of every page, choose View > Header and Footer, anduse the buttons on the Header and Footer toolbar to create the page numbering. Avoid using Insert > Page Numbers.

Curiosity Shop: More about page numbering

For more, much more, about page numbering, see How to control the page numbering in a Word document from the MS Word MVP FAQ site.


ARTICLE TAKEN FROM
http://shaunakelly.com/word/concepts/pagenumbers.html

Make changes, fix mistakes, edit your document

Make changes, fix mistakes, edit your document


Tutorial

The great thing about word processors is that you can go back and edit your document as much as you like, before printing it out.
To edit your document, you need to be able to do two things.

Identify the text you want to affect

If you want to make a change to some existing text (to delete it, format it, move it), you need to identify what text is to be affected. When you do that, you are said to "select" the text. When you select text, Word highlights the text.
At the risk of stating the obvious, you need to identify where the selection is to start. You do that by positioning the cursor. You then need to identify where the selection is to end. You do that by selecting the text. There are umpteen ways to position the cursor and to select text. Here is a small selection:

Five quick ways to position the cursor

  1. Click with the mouse.
  2. Use the arrow keys (the keys between the main area of the keyboard and the number pad). The arrow keys move one line up or down, or one character left or right.
  3. Ctrl + an arrow key moves one word left or right, or one paragraph up or down.
  4. Home moves to the beginning of the line. End moves to the End of the line.
  5. Ctrl-Home moves to the top of the document. Ctrl-End moves to the end of the document.

Five quick ways to select text

Position the cursor, using one of the methods shown above. Then:
  1. Hold down the Shift key. Click where you want the selection to end.
  2. Hold down the Shift key. Use any of the methods listed above to move the cursor to create the selection.
  3. Double-click to select one word.
  4. Triple-click to select one sentence.
  5. Ctrl-a to select the whole document.

Add text

To add text to your document, use the keyboard or the mouse to position the cursor where you want to add your text, then type. If any text is selected, your typing will over-write the selected text.
Tip for old WordPerfect users!
Choose Tools > Options > General. Un-tick both options that mention WordPerfect. If you leave them ticked, Word doesn't behave like WordPerfect anyway. What it does do is that, each time you press Delete, Word asks you to confirm the deletion.

Delete text

Click or use the keyboard to position the cursor. Press theDelete key to delete the character in front of the cursor. Press the Backspace key to delete the character behind the cursor.
To delete a chunk of text, select it and press the Deletekey.

Copy text from one place to another

You can be wonderfully lazy with Word. Don't ever type anything twice!
  • Select the text you want to move.
  • Choose Edit > Copy.
  • Use the mouse or the keyboard to position the cursor where you want the text to appear.
  • Choose Edit > Paste.
In Word 2002, you may see the PasteOptions icon pop up when you doEdit > Paste. For information on how that works, see How Paste Options Works in Word 2002.

Move text from one place to another

To move text:
  • Select the text you want to move.
  • Choose Edit > Cut.
  • Use the mouse or the keyboard to position the cursor where you want the text to appear.
  • Choose Edit > Paste.
To move one or more paragraphs at a time, up or down in the document, select the paragraph(s). Use Alt-Shift-Up Arrow to move the text up. Use Alt-Shift-Down Arrow to move the text down. This works for rows in tables, too.

Change the style applied to your text

Change formatting

To change the formatting of a few words, or to change the formatting of a paragraph separately from its style:
  • Select the text you want to format.
  • Choose Format > FontFormat > Paragraph, or Format > Borders and Shading and make your selections.
Note: when you use this method of formatting, you are said to be applying "Direct Formatting". This formatting is always applied in addition to the formatting of the style of the paragraph. If you find yourself making the same formatting changes several times in the same document, create a style and apply the style. It's much easier!

Reference

To edit your document, select the text you want to change, and make the change. You can add, delete, copy, move, or change the formatting of your document.

Curiosity Shop: More about editing your document

Finding text in your document

You can search for a particular word or phrase in your document. UseEdit > Find. Type in the word or words you want to find and click "Find Next". Word starts searching at the present position of the cursor, and searches towards the end of the document.
You can tell Word to look only for whole words, or to match the case of your typing. That means that, if you search for "Chapter", Word will stop at "Chapter", but skip "chapter".
In later versions of Word, some of the options are hidden. To display them, click More

Find and replace

You can also Find and Replace. Choose Edit > Replace. You can search for, say, "Catherine" and replace with "Katharine". Or search for "Australia" and replace with "Commonwealth of Australia". Or search for "U.S." and replace with "US".
This is actually very powerful stuff. For quite extraordinary ideas on using Search and Replace, see the Word MVP FAQ site.

Checking spelling and grammar

Word includes a standard dictionary against which it checks your spelling. Using Word's spell checking can save you all kinds of embarrassment.
Word also includes a grammar checker. Although Microsoft employslinguists as well as computer programmers, the complexity of human languages, including English, is such that the grammar checker sometimes gets things a bit muddled. Nevertheless, if you're writing important documents, it can be very useful to have the grammar checker check your work.
To turn on spell checking and/or grammar checking, choose Tools > Options > Spelling & Grammar.
To spell-check your document, press F7.


ARTICLE TAKEN FROM
http://shaunakelly.com/word/concepts/edit-word-document.html

Use a bulleted paragraph style for bullets and dotpoints

Use a bulleted paragraph style for bullets and dotpoints

Tutorial

This page is about using bullets or dotpoints in your document. We're working through a sample document.
This page is about multi-level bullets, the kind where lower levels of bullets are indented. If you just need a simple bullet format, with no indenting, see How to control bullets on this site.
The next piece of text we want to add to the document is this:
There are three kinds of lazy dogs:
  • dogs that like to sleep all day
  • dogs that just don't mind foxes jumping over them
  • dogs that have workked hard all day and are now resting.
Obviously the introductory line ("There are three kinds …") is in Body Text style. But how to do the bullets? For the moment, just type the text. Don't worry about the bullets. Don't worry about the fact that we want them indented from the left margin. So your documentlooks like the following (remember the ¶ sign on the screen shows where you pressed Enterto end a paragraph).
There are three kinds of lazy dogs:
dogs that like to sleep all day
dogs that just don't mind foxes jumping over them
dogs that have workked hard all day and are now resting.

How not to add bullets to your text

  • Some users of Word will create bullets using the bullet button on the toolbar. It works, more or less. But it doesn't give you much control over what's going on, it's not stable, and copying from document to document is, let's say, interesting. Not for grown ups.
  • Some users of Word will use Format > Bullets and Numbering. It works, kind of, on Tuesdays, if there's a full moon, if Collingwood beat Carlton last week. It gives you more options to play with than the bullets button, but all that does is complicate matters. Also not for grown ups. Not even Carlton supporters<g>.

How to add bullets to your list

The grown-up way to create bullets is to use a bulleted Style.One easy way to do that is to click on the Style box and select List Bullet. But first you need to tell Word to show you the List Bullet style in the list of styles.

Step 1: Make sure you can see the List Bullet style

To tell Word to show you the List Bullet style in the list of styles, do the following.
For users of Word 2002: On the Format menu, choose Styles and Formatting. The Styles and Formattingtask pane will pop up. Down the bottom, in the Show box, choose "All Styles".
For users of Word before 2002: On the Format menu, chooseStyle. The Style dialog box will pop up. In the Category box, choose "All Styles".

Step 2: Apply the List Bullet style

Locate the Style box on the Formatting toolbar. It probably says 'Normal'.
Figure 1: Locate the Style box on the Formatting toolbar. Click the arrow and choose the List Bullet style.
Click in the first paragraph that you want bulleted. From theStyle box on the toolbar (Figure 1), select List Bullet. That will give you a bullet at the beginning of the paragraph.
You have two more paragraphs to format. You can select both at once, and apply the List Bullet style to both at once. To do that, click anywhere in one paragraph. Hold down Shift. Click anywhere in the other paragraph. Now, use the Style box and choose List Bullet.
You'll see something like the following:
There are three kinds of lazy dogs:
  • dogs that like to sleep all day
  • dogs that just don't mind being jumped over
  • dogs that have workked hard all day and are now resting.
Your List Bullet style probably has your bulleted paragraphs flush against the left margin. But we want them indented by, say, 1.5cm. (I can't cope with the old British Imperial measurement system, so the Americans among you will have to translate into inches. It's very roughly an inch.)

Step 3: Modify the List Bullet style

So, we need to modify the List Bullet style to change the left indent. How to do that? First, make sure the Insertion Point is in one of your List Bullet paragraphs.
In Word 2002, Format > Styles and Formatting. Down the bottom of the pane on the right, set Show to be "All Styles". Now, find List Bulletin the list of styles. Right-click List Bullet and choose Modify. (For older versions of Word, Format > Styles. Click Modify.)

Step 3.1: The Modify Style dialog box

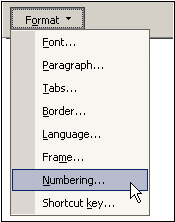
In the Modify Style dialog box, click Format then Numbering. Word controls the format of bullets, including indents, by the Numbering options.
Figure 2: In the Modify Style dialog box, click Format, then Numbering.
We're now in the Modify Style dialog. Click Format, then Numbering (Figure 2). Yes: Numbering. Common sense says that modifying a left indent has nothing to do with numbering. It seems like the left indents should be controlled from the Paragraph settings.True. In my view, it's a bug.
It might also seem odd to have to click Numbering when you want to deal with bullets. But Word thinks they're much the same thing. So click Numbering.

Step 3.2: The Bullets and Numbering dialog box

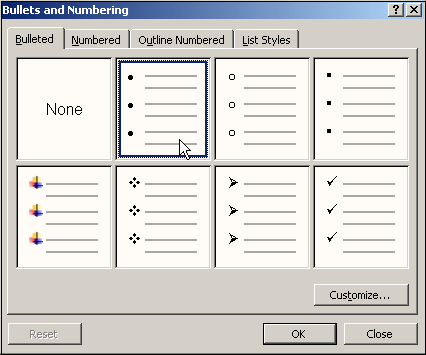
In the Bullets and Numbering dialog box, one scheme may already be highlighted. Always choose the highlighted scheme. Then click Customize
Figure 3: In the Bullets and Numbering dialog box, one scheme may already be highlighted. Always choose the highlighted scheme, then click Customize. This picture is from Word 2002. Your dialog box may look different if you have an earlier version of Word, or if you havecustomized any of the schemes.
You're now at the Bullets and Numbering dialog box. Click the Bulleted tab. You will see 8 schemes for bulleting (Figure 3).
  • If one scheme is highlighted, perhaps with a blue border, choose it. No matter how tempting the other ones look, click the highlighted one and then click Customize.
  • If none of the 8 schemes is highlighted, choose the one that looks most like what you want to achieve, and click it. Then, clickCustomize. And … promise yourself now that, if you have to come back to this dialog box, you will always choose the highlighted scheme.

Step 3.3: The Customize Bulleted List dialog box

In this dialog box, you can have a bit of fun. For example, you could click the Font button to make the bullets red. More usefully, you set the indents here.
This dialog box wins my award for inscrutable communication of the decade! It's about as intuitive as jumping out of a 747 without a parachute. The dialog box has changed a bit over the years (and in the process become even more inscrutable) so I'll show you two versions of it.

Modifying indents for bullets in Word 2002

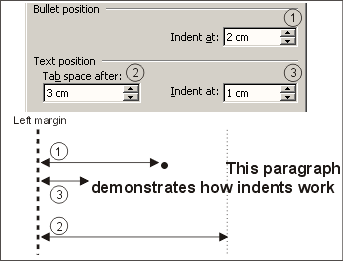
In Word 2002, line up your bullets using these rules (Figure 4):
How to set indents for bullets in Word 2002
Figure 4: How to set indents for bullets in Word 2002 in the Customize Bulleted List dialog box. In this example, if you want"demonstrates" to line up under "This paragraph", use 2cm, 3cm, 3cm.
  1. Bullet Position = How far in from the left margin do you want the bullet?
  2. Text Position-Tab Space After = How far in from the left margin do you want the text on the first line to start?
    If you set this to a number less than the Bullet Position setting, Word ignores your choice and improvises. If your number won't fit in the space you allocate (for example, a big bullet won't fit in 0.2 cm), Word will push the text to the next tab stop.
  3. Text Position-Indent at = How far in from the left margin do you want the text on the second and subsequent lines to start? (If you want the text on the second and subsequent lines to start directly under the text on the first line, set this to equal the Tab Space After measure.)
In the example we're creating above, appropriate settings would be 1.5cm, 3cm, 3cm (or in the British Imperial measurement system, perhaps 1", 2", 2").
Word 2002 Tip: Once you have set the indents for your bullets this way, don't change the tabs or paragraph indents for paragraphs in your bulleted style, or you will ruin your good work and have to start again.

Modifying indents for bullets in earlier versions of Word

How to set indents for bullets in Word 2000
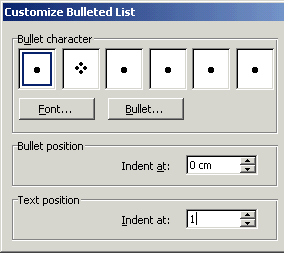
Figure 5: How to set indents for bullets in Word 95, 97 and 2000 in the Customize Bulleted List dialog box. In this example, the bullets arelined up against the left margin, and the text is 1cm from the left margin.
In Word 95, 97 and 2000, the Customize Bulleted List dialog is easier to understand, but doesn't give you quite as much control.
There are two positions to set (Figure 5):
  • Bullet position – Indent at = How far in from the left margin do you want the bullet?
  • Text position – Indent at = How far in from the left margin do you want the text?
Word 95, 97 and 2000 Tip: Once you have set the indents for your bullets this way, modify the List Bulletstyle to remove all the tabs from the style. If you visit the Customize List Bullet Style dialog again,you'll have to remove the tabs again, too.

Reference

  • Grown ups don't use the bullets button on the toolbar.
  • Grown ups don't use Format > Bullets and Numbering.
  • To create bullets or dot point paragraphs, use a style (for example, the List Bullet style).
  • To ensure that Word displays the List Bullet style so you can select it, do this.
    • In Word 2002,on the Format menu, choose Styles and Formatting. The Styles and Formatting task pane will pop up. Down the bottom, in the Show box, choose "All Styles".
    • In Word before 2002: On the Format menu, chooseStyle. The Style dialog box will pop up. In the Category box, choose "All Styles".
  • Apply the List Bullet style to add bullets to your paragraphs.
  • Set the indents for bullets by modifying the Numbering format of the style, not the Paragraph format of the style.For information on how to do the indents, see above. For more information on how to modify a style, see How to Modify a Style.

Curiosity Shop: More about bullets

How to create several "levels" of bullets

To create several "levels" of bullets, each indented a little further from the left margin, the best way is to choose a style for each "level". An obvious choice of styles would be List Bullet, List Bullet 2, List Bullet 3 etc.Then, follow the instructions at How to create numbered headings or outline numbering in your Word Document. When the instructions there tell you to choose a Number Style,choose a Bullet from the drop-down list.

Bullets don't have to be round blobs

In Word 2002, you can use a picture as a bullet. Even in earlier versions, you can choose a symbol other than a round blob.Follow the directions above to get to Step 3.3, the Customize Bulleted List dialog box. In that dialog, click Character, then choose a character for your bullet. Look for appropriate characters in the Symbols orWingdings fonts. Ticks, crosses and arrows make good bullets. Or create a checklist by using an empty square as the bullet.

Brighten up a dreary day at work by making your bullets flash on and off

If you're having a bad day at work and you have Word 97 or above, you can make your bullets flash. Follow the directions above to get to theCustomize Bulleted List dialog box. In that dialog, click Font, then choose the Text Effects tab. Choose the Blinking Background effect, ortry one of the other effects.
No, there is no sensible use for this feature except to have a bit of fun.
No, the bullets won't flash when printed on a piece of paper!


ARTICLE TAKEN FROM
http://shaunakelly.com/word/concepts/bullets.html

In Microsoft Word, use tables and tabs to arrange text

In Microsoft Word, use tables and tabs to arrange text


Tutorial

We're creating the sample document and our next challenge is to position text on the page rather than just creating paragraphs of body text.

Use tables and tabs to arrange text, not the spacebar

This is the text we're trying to produce:
Information about this document
Characters in the story
One fox, one dog.
Action in this story
Jumping
Number of different letters used in the story
26
There are three kinds of lazy dogs …
In the old days, on a typewriter, you would do this by setting two tabs.
You would tab once and type "Characters in the story". Then tab again to type "One fox, one dog.". If you used the space bar instead of the tab, it would make no difference to the final document.
Word does it completely differently. You can use tabs to set up text like this, but it would be awkward. Much easier to create a table.

What's a table got to do with positioning text?

When you hear "table" you're probably thinking of something that looks like this:
 BudgetActualVariance
Salaries and wages$20,000$19,345$655
Stationery$3,000$3,125($125)
Rent and cleaning$5,200$5,250($50)
Other expenses$1,800$750$1,050
Total expenses$30,000$28,470$1,530
Yes, that's a table. But if we had only text in the table, and took out the borders, we could use a table to position our text on the page.
There are two huge advantages of arranging text in a table. The first is that it is really easy to change the widths of the columns, which will determine how far left or right our text is positioned on the page. The second is that text wraps within a cell of the table. You don't have to work out how much text will fit on one line, and how much should go to the next. Word will do that for you.

How to create a table to hold your text

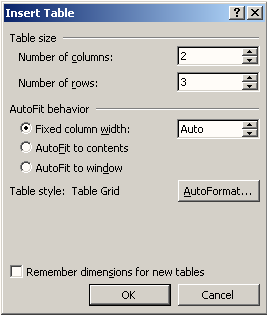
Insert Table dialog box
Figure 1: The Insert Table dialog box in Word 2002 (earlier versions will look a little different)
Position the Insertion Point (or cursor) where you want the table. For our sample document, that will be in the paragraph below the heading "Information about this document".
In recent versions of Word, from the main menu, choose Table > Insert > Table. In older versions of Word, from the main menu, chooseTable > Insert. You're now at the Insert Table dialog (Figure 1).
You need two columns and three rows.
If you have a recent version of Word, make sure that you have selected Fixed Column Width, and that it is set to Auto. This is because, for this purpose, we need to decide for ourselves how wide the columns will be.

Your new table: Borders and Gridlines

When you click OK, Word will insert your new table.
There are two kinds of lines you will see around the cells of tables. Some are borders (Figure 2). Borders are seen when you print the document. You can change the borders, their thickness, color and style. Or you can delete them.
A new table inserted into a Word document. You can see borders around each cell of the table.
Figure 2: A new table with borders
A new table inserted into a Word document. This table has no borders, but you can see the gridlines.
Figure 3: A new table without borders, but showing Gridlines. (Gridlines are guides that don't print.)
Other lines you will see are Gridlines (Figure 3). These are like the Text Boundaries that show you where your margins are. Gridlines don't print. Gridlines show you where the table is, so you know where to type your text. If you don't see any kind of lines in your table, choose Table > Show Gridlines (or Table > Gridlines in earlier versions of Word).
Sometimes, when Word inserts a new table, the table will have borders around all the cells (it depends on what version of Word and how your machine is set up). Sometimes it won't have borders, but you will still be able to see the gridlines. As you can see from these screenshots (Figures 2 and 3), it's sometimes difficult to tell which is which.

Your new table: What else can you notice?

There are several things to note here.
  • There are two vertical columns, and three horizontal rows. Each box in the table is called a Cell.
  • In each cell there's a sign like End of cell marker sign. It looks like a funny circle with spokes, like a star or a mis-shapen wheel. That's the end-of-table-cell marker. It is analogous to ¶, which is the end-of-paragraph marker. (If you don't see the End of cell marker sign, press the ¶ button on the Standard Toolbar.)
  • By default, the table is positioned just left of the left margin, and stretches to just right of the right margin. Word's default puts the table on the page so that text in the left column of the table will line up with text outside a table.
  • There is always a paragraph after a table. Even if the table is the last thing in the document, there will be a paragraph after it, and you can't delete that last paragraph mark.

How to format your table for this document

There are four things we need to do to this table:
  • We have to add our text in the cells of the table.
  • We have to apply the appropriate style to the cells of the table.
  • We may need to get rid of the borders.
  • We want our text to be indented from the left margin. So we'll have to move the table over to the right.

How to type text in your table

Click in a cell to type in that cell. Use Tab to move from one cell to the next. Complete your table so it looks something like the following.
Information about this document
Characters in the storyEnd of cell marker
One fox, one dog.End of cell marker
Action in this storyEnd of cell marker
JumpingEnd of cell marker
Number of different letters used in the storyEnd of cell marker
26End of cell marker
There are three kinds of lazy dogs …
(Note: If you are in the last cell of a table, and you press Tab, Word will automatically create a new row. If you do that accidentally, and you don't want it, choose Edit > Undo.)

How to apply the appropriate style to the text in the table

All of this text is Body Text. We can apply the style to the whole table at once.
To do that, click anywhere within the Table. In later versions of Word, choose Table > Select > Table. In earlier versions of Word, Table > Select Table.
That will select (highlight) the whole table.
To apply the Body Text style, from the Formatting Toolbar, click in theStyles box, and choose Body Text from the drop-down list.

How to remove the border

Your table may have borders around it. If so, we need to remove them. To do that, click anywhere within the table. Then, on the main menu, click Format > Borders and Shading. Click the None box, and then OK.
You will still be able to see the gridlines, which are the guides to help you see where your table is so you can manipulate it.

How to move the table horizontally, and change the column widths

You can drag the vertical gridlines to change the horizontal position of the table, and to change the column widths.
Hover your mouse over the vertical gridlines between columns. When your mouse hits the sweet spot, the cursor turns to a double-headed arrow. You can now click and drag the columns to change the width of the column.
Figure 4: Hover your mouse between columns. When your mouse hits the sweet spot, the cursor changes to a double-headed arrow. You can now click and drag left or right to change the width of the column.
Click once anywhere within your table. (Make sure no text is highlighted.) Hover your mouse over any of the vertical gridlines (the left of the table, the right of the table, or the one between the columns).
When you hit the sweet spot, the cursor will change to a double-headed arrow pointing left and right (Figure 4). When you see that, click and drag to the left or right.
You can use this to manipulate your table to get the columns just the way you want them.

Reference

This page has shown you how to arrange text on the page using Tables.
  • Don't use the spacebar to position text. The spacebar has only one function: to create a space between words.
  • To insert a table, choose Table > Insert > Table. (In earlier versions of Word, Table > Insert.)
  • Columns are vertical. Rows are horizontal. The squares at the intersection of a row and a column are called cells.
  • To select the whole table, choose Table > Select > Table (or in earlier versions of word Table > Select Table.)
  • To add or remove borders (lines that print) around the cells of the table, select the table, then choose Format > Borders and Shading. Click None.
  • Even when your table has no borders, you will see gridlines. These don't print. They are guides to allow you to manipulate your table. If you don't see the gridlines, click Table > Show Gridlines (orTable > Gridlines).
  • Click in a cell to type in that cell. Use tab to move from cell to cell.
  • Use your mouse and drag sideways to move the left edge of the table, the right edge of the table, or the gridlines between columns.

Curiosity Shop: More about tables

How to add rows to your table

To add a row to the bottom of your table, click in the last cell and press Tab.
To insert a row in the middle of your table, click in the row where you want to insert the table. Choose Table > Insert > Rows Above orRows Below. (In earlier versions of Word, choose Table > Insert > Row. Word will insert the row above the current row.)

How to delete rows from your table

Click within the row you want to delete. Choose Table > Delete > Rows.

How to move rows up or down in your table

To move a row up or down within a table, click in the row you want to move. Do Shift-Alt and up arrow to move the row up. Use Shift-Alt and down arrow to move the row down.
It's worth remembering the combination of Shift-Alt + an arrow key. The same combination can be used to move any paragraph of text up or down within the document. So remember it now: Shift-Alt + an arrow key.

How to sort rows in your table

Let's say you have a table with three rows: carrots, apples, bananas. You need to sort them into alphabetical order. To do this, click anywhere in your table, and choose Table > Sort (or Table > Sort Text). You get several different options where you can choose how to perform the sort.

How to format the borders and background colours in a table

Word has lots of options on the Format > Borders and Shading dialog box. You could create a table that looked like this, to use in a birthday party invitation:
When?Saturday 16 October
What time?7pm for 8pm
Where?123 Smith Street
Why?It's my birthday
What?Drinks at 7pm, dinner at 8pm
Click within your table, then choose Format > Borders and Shading. Choose the Borders tab. In that dialog box, select your line styles, widths and colours. Apply those lines to all or part of a table by clicking on the example table in the dialog box. Click once to apply. Click again to remove the border.
At Format > Borders and Shading on the Shading tab, you can add background shading to your table or to individual cells of the table. Note that some of the colours used in the example above aren't available in earlier versions of Word.

How to keep a row as a "heading" row at the top of each page

Let's say you have a table like the Budget / Actual / Variance table, above. But your table is much longer, and extends over several pages. You might like to have the "Budget Actual Variance" row appear at the top of the table on each page. To do this, put your cursor in the top row, and choose Table > Heading Rows Repeat (or Table > Headings in earlier versions of Word).


ARTICLE TAKEN FROM
http://shaunakelly.com/word/concepts/tables.html